With the release of Sitecore 9.2, SXA 1.9 and JSS 12.0.0 on July 22nd 2019, Sitecore JSS has become even more connected with the whole Sitecore Experience Platform, allowing JSS to leverage Sitecore Experience Accelerator functionality like page and partial designs.
To actually install this powerful combo, a lot needs to be done. Sitecore 9.2 has to be installed, module packages like SPE, SXA and JSS server components need to be installed, SXA indexes need to be created etc…
If you would like to have an extended step by step guide on for example only the SXA module installation, have a look at Peter Prochazka (chorpo)‘s blogpost: Sitecore SXA 1.9 Installation Guide for Development Machine, which goes into all the steps necessary. As you can see in his blog-post it is a tedious job.
In this blog-post I’m going to walk you through one of the gems out there, developed by the Sitecore demo team, that does all the above in an automated installation. And yes, once again, we’re going to make use of the fantastic Sitecore.HabitatHome.Utilities repository.
Sitecore.HabitatHome.Utilities
I’m assuming you’ve read my previous blog-posts on for example Using Sitecore HabitatHome Utilities to install the latest Sitecore 9.1 for your own sites and Introducing Habitat Home Corporate on Sitecore 9.2, where I’ve used the Sitecore.HabitatHome.Utilities repository before. And for this post, I’m assuming that you’ve cloned the repo, installed the pre-requisites, SOLR 7.5.0 is up and running. If not, head back to the Sitecore 9.2 installation first section in this blogpost: Introducing Habitat Home Corporate on Sitecore 9.2.
For this blogpost, let’s use a prefix for the instance that we’re going to install, adjust this in set-installation-overrides.ps1 in the C:\projects\Sitecore.HabitatHome.Utilities\XP\install directory
- [string] $prefix = “sitecore-sxa19spe50jss12-demo”
Yes, I know it’s not an easy hostname, haha, but that’s not what I want to demo here. I want to show you how easy it is to have a local developer environment setup with modules installed automatically in just a matter of minutes (even though installing Sitecore 9.2 takes the most amount of time here).
Assuming you’ve also configured the SQL Server credentials properly, with that new prefix in place, let’s head over in the Powershell Session to the \XP\install directory. Run the following scripts in the following order:
- set-installation-defaults.ps1
- set-installation-overrides.ps1
The above execution of the Powershell scripts generated a configuration-xp0.json file in the \XP\install directory, which contains all your configurations that the Install script need in order to install our desired configuration.
Run install-singledeveloper.ps1 to install a brand new instance of Sitecore 9.2 with the hostname of https://sitecore-sxa19spe50jss12-demo.dev.local/. This will run for about 14 minutes. Once that is done, let’s move to the part this blog-post is all about. Installing Sitecore modules in an automated way.
Install Sitecore modules
Not only does the previously generated configuration-xp0.json file contain all the configuration (paths, assets etc..) to install Sitecore 9.2, it also contains all the configuration of possible modules that can be installed.
For this blog-post, we’re going to enable (and it’s really just a matter of setting modules to install to true) SXA, SPE and JSS, but I would like to display all the modules that can be auto installed:
- Sitecore PowerShell Extensions (SPE)
- Sitecore Experience Accelerator (SXA)
- Data Exchange Framework
- Sitecore Provider Data Exchange Framework
- SQL Provider Data Exchange Framework
- Connect Provider Data Exchange Framework
- Dynamics Provider Data Exchange Framework
- Dynamics Connect Data Exchange Framework
- Salesforce CRM Provider for Data Exchange Framework
- Connect for Salesforce
- Data Exchange Framework Save Action for Experience Forms
- Sitecore Connect for Salesforce Marketing Cloud
- Stackla Module
- xGenerator
- StyleLabs Plugin
- JavaScript Services (JSS)
Let’s open up configuration-xp0.json, and head over to the “modules”: section. What we’re going to focus on are the following module configurations
{
“id”: “spe”,
“name”: “Sitecore PowerShell Extensions”,
“fileName”: “C:\\projects\\Sitecore.HabitatHome.Utilities\\XP\\install\\assets\\modules\\Sitecore PowerShell Extensions-5.0 for 9.2.scwdp.zip”,
“url”: “https://dev.sitecore.net/~/media/7AB15C0432624E6CA9786DF00DD653AB.ashx”,
“install”: true,
“convert”: false,
“databases”: “master,core”
},
{
“id”: “sxa”,
“name”: “Sitecore Experience Accelerator”,
“fileName”: “C:\\projects\\Sitecore.HabitatHome.Utilities\\XP\\install\\assets\\modules\\Sitecore Experience Accelerator 1.9.0 rev. 190528 for 9.2.scwdp.zip”,
“url”: “https://dev.sitecore.net/~/media/1A7A3C021C7649C98DA83EF50E624C8E.ashx”,
“install”: true,
“convert”: false,
“databases”: “master,core”,
“additionalInstallationSteps”: “sxa-installation-poststeps.json”
},
{
“id”: “jss”,
“name”: “JavaScript Services”,
“fileName”: “C:\\projects\\Sitecore.HabitatHome.Utilities\\XP\\install\\assets\\modules\\Sitecore JavaScript Services Server for Sitecore 9.2 XP 12.0.0 rev. 190522.scwdp.zip”,
“url”: “https://dev.sitecore.net/~/media/1D5D53DE1F4B43E8B3D70E0D0EE40A5D.ashx”,
“install”: true,
“convert”: false,
“databases”: “master,core”
}
The JSS configuration is all the way to the bottom of the file. By default only SPE and SXA have install configured to ‘true’, so therefore the only thing we need to adjust is the JSS one for this installation. Set “install”: true.
With that in place, the only thing we need to run in the Powershell Session (in the \XP\install directory) is the following:
- .\install-modules.ps1

The installer downloads all the necessary .scwdp packages (web deploy) from dev.sitecore.com and it uses the Sitecore Azure Toolkit to install them locally. For the above mentioned install it will take about 7 to 8 minutes.
Head over to https://sitecore-sxa19spe50jss12-demo.dev.local/sitecore, log in, in the Update Center you can see that the configured modules were installed. (it doesn’t show JSS however, so not sure what configuration comes with SPE and SXA that it ends up in the list of installed modules).

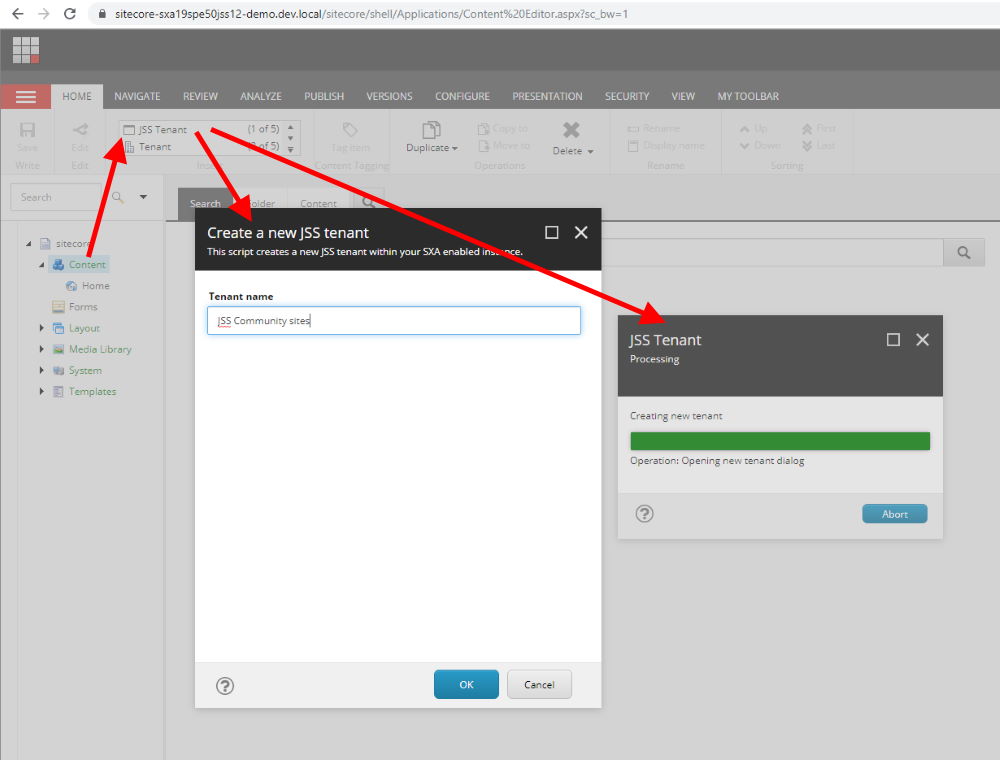
Head over to the Content Editor, and go to the /sitecore/content item, where you can create a new JSS Tenant (see screenshot below). As you can see all modules were installed correctly.
Sitecore.HabitatHome.Utilities is great for quickly installing all kinds of setups locally, whether it’s to showcase the Stylelabs capabilities or play with the latest Sitecore JSS & SXA integration. Have a look yourself … 😉
Happy Sitecoring …
Robbert