When Sitecore introduced Sitecore 9, they also introduced SIF (Sitecore Installation Framework). The Sitecore Installation Framework enables users to deploy and configure a Sitecore environment using a standard configuration design that can be extended through custom PowerShell functions. When that was introduced, Sitecore MVP Rob Ahnemann introduced a tool called SIF-less.
This was SIF-Less 1.0, and was a Winforms application where you actually configure a lot of parameters (where’s the license file located, where are the Sitecore 9 WDP zip files located etc…) and in the end it generates one big power-shell file, that you can run which installs the appropriate version of your Sitecore 9 install.
I’ve used SIF-Less 1.0 for my previous local deployments, but also used it as a starting point for my project team’s local environment deployments and even used it for setting up the base, and then adjusting the SIF scripts manually for deploying out on-prem infrastructures for higher environments.
So about half a year ago Rob came up with an updated version of SIF-Less tool, called 2.0. Being very busy on a project, not having the need to actually start using the new version & due to time constraints, I did’t look at the updated version. But now I’ve finally found the time and wanted to explore the new 2.0 version.
In this blogpost I would like to walk you through that various configurations you can do to start installing Sitecore 9.1 with a breeze.
Install pre-requisites SIF & SOLR
SIF
Let’s make sure that we have the Sitecore Installation Framework 2.0.0 installed. You must use SIF to install Sitecore. The framework deploys Web Deploy Packages (WDP) by passing parameters to SIF configuration files through a Microsoft® PowerShell module.
Open up a Powershell prompt and do the following in order to register the SIF powershell repository:
- Register-PSRepository -Name SitecoreGallery -SourceLocation https://sitecore.myget.org/F/sc-powershell/api/v2
Once the powershell repository in registered, you have to install it:
- Install-Module SitecoreInstallFramework
SOLR 7.2.1
Before actually being able to run Sitecore 9.1, we need to have SOLR 7.2.1 installed. If you don’t know how to that, you can read upon my blogpost ‘Installing SOLR 7.2.1 (on prem) for Sitecore 9.1’
Sitecore Experience Platform 9.1 Initial Release packages for On Premises deployment
You have to download the packages for On Premises Deployment (packages for XP Single, XP scaled, XM scaled) and save them to your harddrive. In this blogpost we’re going to install a Sitecore 9.1 xp0 environment. So unzip the Sitecore 9.1.0 rev. 001564 (WDP XP0 packages).zip file and in there unzip the following file: XP0 Configuration files 9.1.0 rev. 001564.zip
SIF-Less 2.x
At the moment of writing SIF-less is at version 2.1.2. You can download the latest version here. Extract the Sifless.zip in a directory and start to run the following exe file:
- SIFLess.exe
This will open up the SIF-less application.

When opened we can see 3 sections that we need to create profiles for:
- Sitecore Profile – Add multiple Sitecore profiles per configuration (xp0, xp1 etc..)
- Connection Profile – Set up your connection to the database
- SOLR profile – Setup your connection to your SOLR 7.2.1 instance (how to set it up can be found here)
Let’s create a Sitecore profile first by clicking on Manage (above Sitecore Profile)
Sitecore Profile
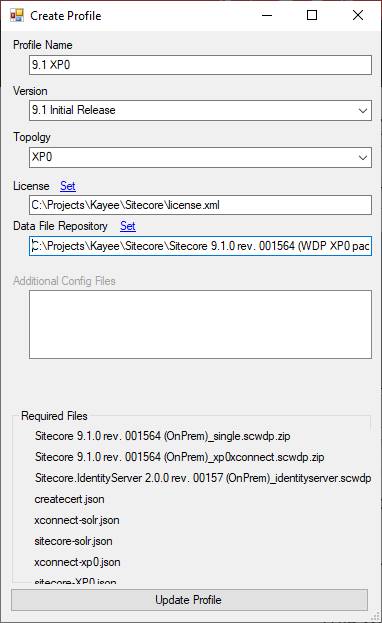
In the Sitecore Profile we can create several Sitecore profiles, where we configure what Sitecore environment we’re going to install. In this blog-post, like said before, we’re going to install a XP0 topology (The Sitecore Experience Platform, running as a single instance which is best used for development and testing. For security and scalability reasons, it is best practice to use the XM1 or XP1 configuration in production environments.
- Profile name – So let’s name it 9.1 XP0 (but you can give it any name you want),
- Version – select 9.1 Initial Release, since we’re installing that version
- Topology – Select XP0 from the dropdown
- License – Select the license.xml file on your file system
- Data File Repository – Select the directory where you extracted the XP0 zip file (in my case C:\Projects\Kayee\Sitecore\Sitecore 9.1.0 rev. 001564 (WDP XP0 packages))
Create the profile and return to the main SIF-Less start screen.
Connection Profile
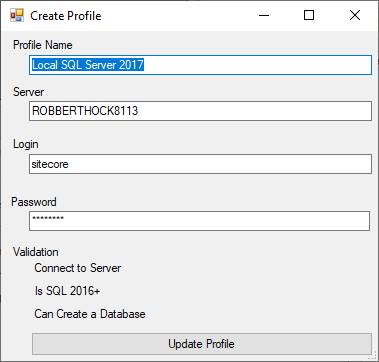
In the Connection Profile section, we can create several Connection profiles, where we configure the SQL Server Connection
- Profile name – Let’s name this one Local SQL Server 2017 (since that’s the targeted version for Sitecore 9.1 – but you can give it any name you want)
- Server – The name of your local SQL Server, in my case my VM name
- Login – A SQL Server login with the necessary rights
- Password – The SQL Server password for the SQL Server login account
Create the connection profile and return to the main SIF-Less start screen.
SOLR Profile
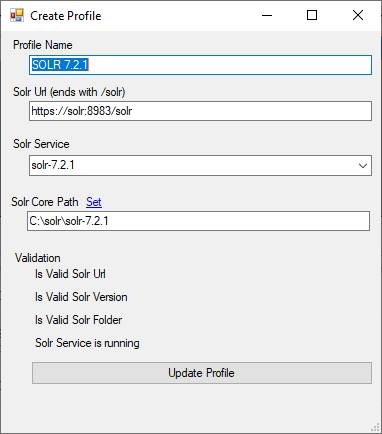
In the Solr Profile section, we can create several SOLR profiles, where we configure the SOLR instance connections. You could potentially have more Solr versions running on different ports (depends if you’re working with multiple versions of Sitecore on your same machine)
- Profile name – Let’s name this one SOLR 7.2.1 (since that’s the SOLR version that is necessary for running Sitecore 9.1 – but you can give it any name you want)
- Solr url – In my case points to https://solr:8983/solr
- Solr service – Select the solr-7.2.1 from the dropdown
- Solr Core Path – The path where Solr was installed, in my case: C:\solr\solr-7.2.1
Create the Solr profile and return to the main SIF-Less start screen.
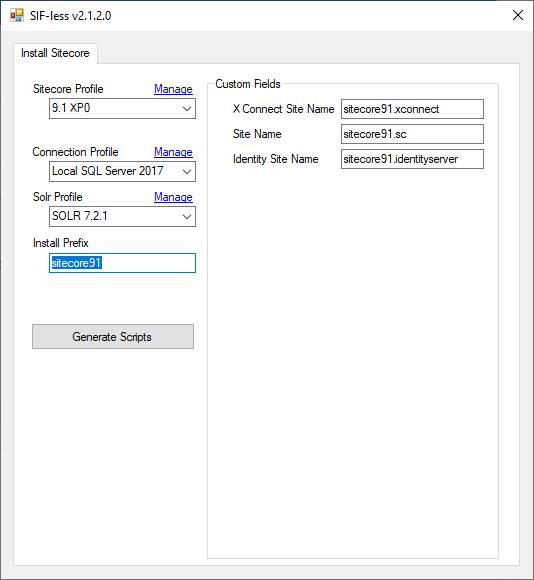
In the main SIF-Less screen we can then configure a Install Prefix, for example in this case: sitecore91. This prefix is then used in the following fields:
- XConnect Site Name
- Site Name
- Identity (server) Site Name
Generate SIF script
Once that is all configured, we can hit the Generate scripts button. SIF-Less will create a Powershell file, that you can then run in Windows Powershell, and which will install and configure your local XP0 topology. All in all it will take about 11 to 13 minutes to install Sitecore 9.1 XP0 locally.
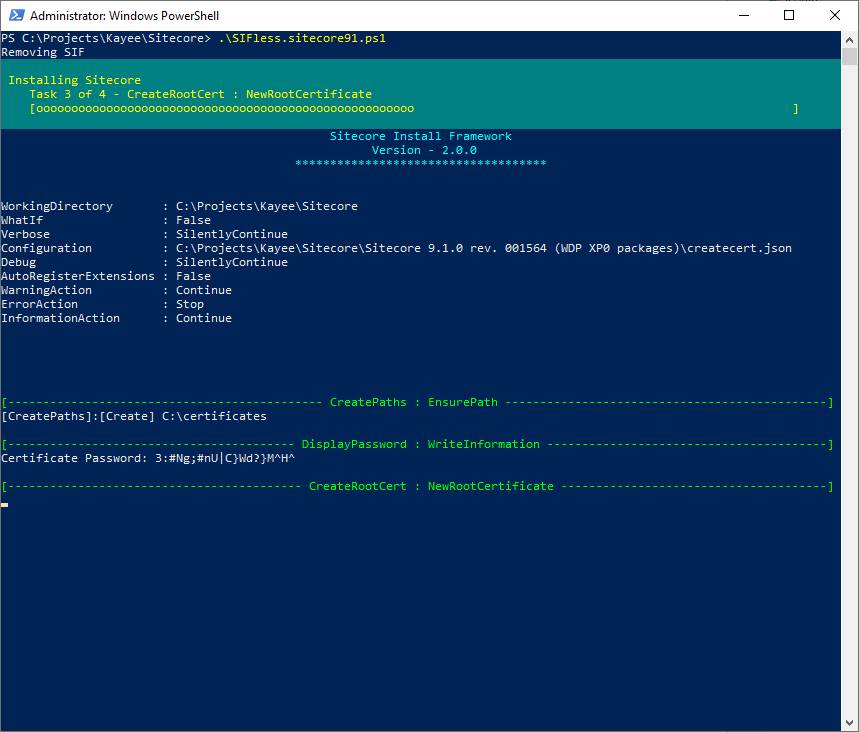
Once the installation is done, you can go to IIS and start the added and configured sitecore91.sc site and browse to it.
And that’s it. It’s easy peasy to install Sitecore 9.1 with SIF-Less!
Big shout out to Sitecore MVP Rob Ahnemann for building this tool!
Happy Sitecoring …