
It’s been a while since my last blog. Over the course of the past 1.5 years, I have gained extensive experience working on multiple headless Sitecore projects where I’ve been able to construct decoupled, high-performance, and scalable front-end applications that seamlessly integrate with Sitecore’s powerful CMS capabilities. Most of these projects utilized the Sitecore JavaScript Rendering SDK (JSS) in combination with Next.js, but my current project is leveraging the Sitecore ASP.NET Core Rendering SDK. The Sitecore ASP.NET Core Rendering SDK provides a set of tools for rendering Sitecore content in your application, including tag helpers, model binders, and view components.
One of the most important aspects of using the Sitecore ASP.NET Core Rendering SDK, is understanding the specific process how incoming HTTP requests are handled by the ASP.NET Core application. Here’s an overview of the steps involved:
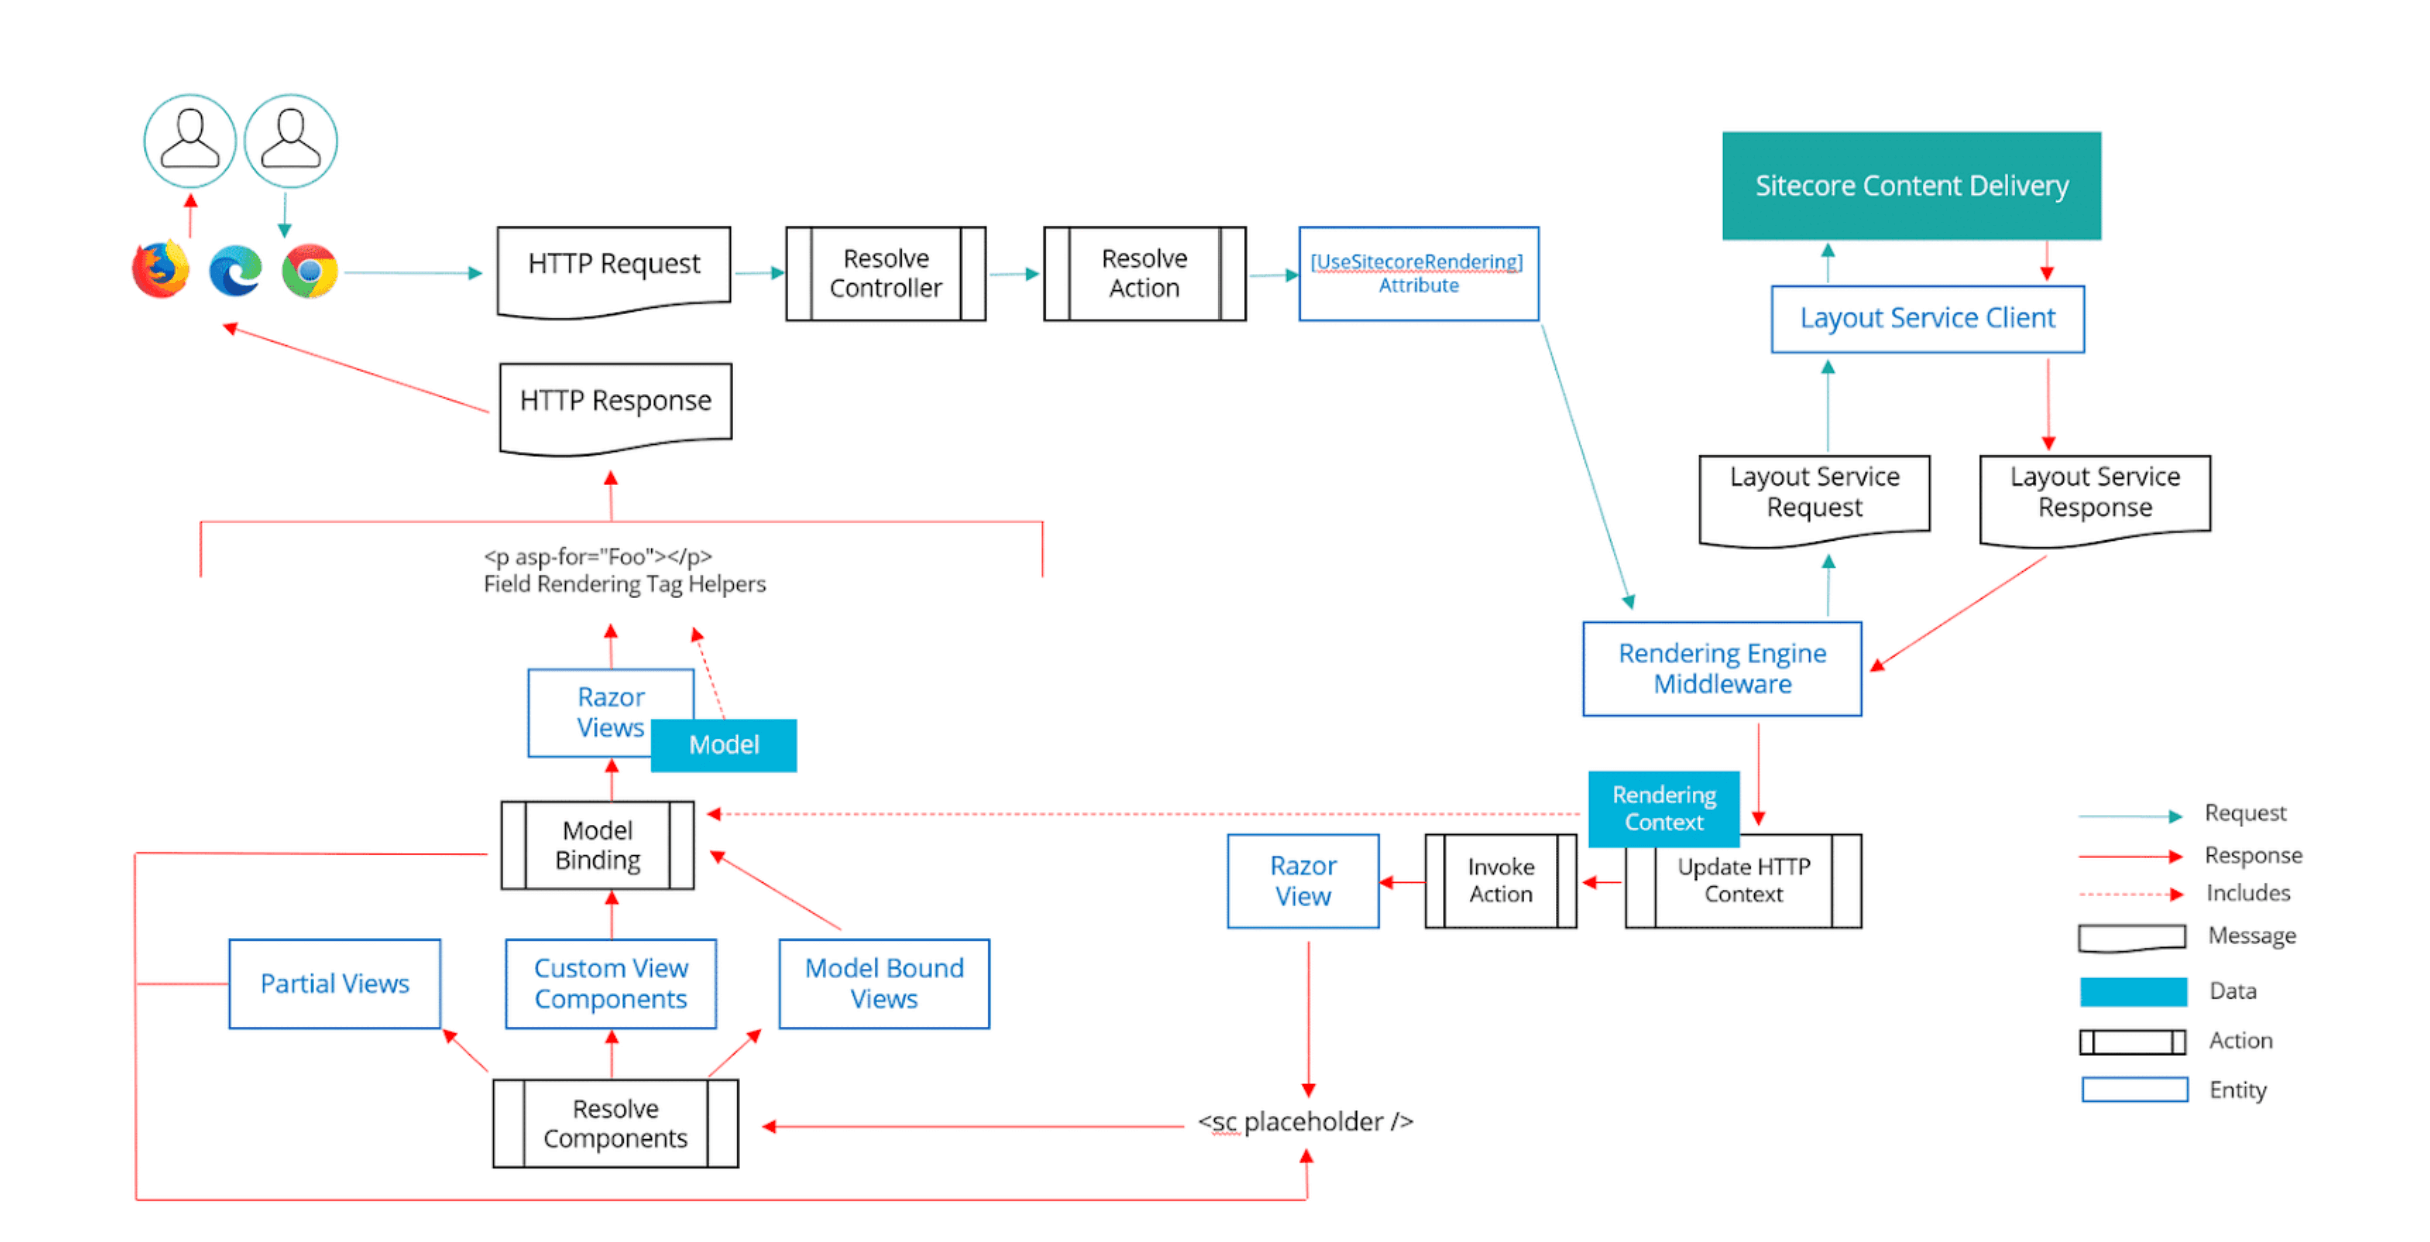
- Resolve the request to a controller and action using the standard ASP.NET Core process.
- Inject the Sitecore Rendering Engine middleware by placing an attribute on the controller action. This attribute tells ASP.NET Core to add the middleware, which will run before the action is invoked.
- In the middleware, make a request to the Sitecore Layout Service using values from the HTTP request, such as the incoming path.
- Receive the response from the Sitecore Layout Service and place it in a rendering context in the ASP.NET Core HTTP context. This data will be used later as you render placeholders and fields.
- Invoke the controller action and begin to render your Razor view. You can use the Sitecore placeholder tag helper to render your root placeholders, which will allow you to begin rendering your full component tree.
- Implement your components with partial views, view components, or something called model-bound views. In the process, take advantage of Sitecore’s extensions to ASP.NET Core model binding to get values from the rendering context into a strongly typed model.
- Pass those values into Sitecore’s tag helpers to render Sitecore content fields or render them in other ways.
- Ultimately, create the HTTP response that goes back to the user.
Let’s take a closer look at each of these steps.
Step 1: Resolve the Request
The first step in handling an incoming HTTP request is to resolve it to a controller and action using the standard ASP.NET Core process. This process is the same as it would be for any other ASP.NET Core application. When the request comes in, ASP.NET Core will look at the URL and map it to a controller and action based on your routing configuration.
Step 2: Inject the Sitecore Rendering Engine Middleware
Once the request has been resolved to a controller and action, you’ll need to inject the Sitecore Rendering Engine middleware. This middleware is what allows you to render Sitecore content in your application.
To inject the middleware, you’ll need to place an attribute on the controller action: ‘UseSitecoreRendering’. This attribute tells ASP.NET Core to add the middleware to the request pipeline.
Step 3: Make a Request to the Sitecore Layout Service
With the middleware in place, you can now make a request to the Sitecore Layout Service. This service is what provides the content that you’ll be rendering in your application.
To make the request, you’ll need to use values from the HTTP request, such as the incoming path. Once the request is sent, you’ll receive a response that contains the data you need to render your content.
Step 4: Place the Response in a Rendering Context
Once you have the response from the Sitecore Layout Service, you’ll need to place it in a rendering context in the ASP.NET Core HTTP context. This context is what you’ll use later as you render your placeholders and fields.
Step 5: Invoke the Controller Action and Render Your View
With the rendering context in place, you can now invoke the controller action and begin rendering your Razor view. You’ll use the Sitecore placeholder tag helper to render your root placeholders, which will allow you to begin rendering your full component tree.
Step 6: Implement Your Components
As you render your components, you’ll implement them using partial views, view components, or model-bound views. With model-bound views, you’ll take advantage of Sitecore’s extensions to ASP.NET Core model binding to get values from the rendering context into a strongly typed model.
Step 7: Use Tag Helpers to Render Sitecore Content
Once you have your components in place, you can use Sitecore’s tag helpers to render Sitecore content fields or render them in other ways. You’ll pass the values from your strongly typed model into the tag helpers to render the content.
Step 8: Create the HTTP Response
Finally, you’ll create the HTTP response that will be sent back to the user. This response will contain the rendered Sitecore content along with any other content that you’ve added to the view.
And that’s it, hope you got a good overview of all the steps involved in handling the incoming http request in a Sitecore ASP.NET Core Rendering SDK enabled app.
Happy Sitecore-ing!
–Robbert


